I’ve been riding Motorcycles for almost a decade now, and when I say riding- I mean it’s been my primary form of transportation for that entire time. Unlike all my friends I’ve never partaken in that investment of a car, which has certainly saved me the hefty payments and insurance. Though, arguably at the risk of my own personal safety! But, this last decade has treated me well and hopefully things will continue to look up. I’ve had two bikes in that time and I’ve always been a bit timid about adding a graphic design on my bike- until recently.
 The excuses were always the same, the cost will be ridiculous, the time to design the graphic or apply it will render it pointless. All good points, all completely wrong. Now to be fair, I’m not suggesting wrapping your entire bike would be easy or cheap. No, I’m talking about adding a decal and graphic to your bike in an appealing manner. Lettering on the Cheap recently did me a few favors and applied a graphic to my bike to prove this point. I won’t lie, I went into this skeptical: but in the end I became a believer. If I can do this, so can you- and I’m going to tell you how.
Graphic Design for Motorcycles: The Real Deal
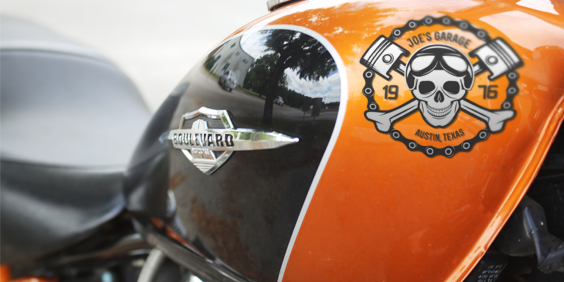
 The first stage to any do it yourself project is making a plan for your project. This wasn’t too hard once I had the idea and luckily just browsing around on Google Images for a while I found a wealth of inspiring designs and ideas. I decided to keep the graphic simple and clean, a reflection of the design of the bike. Once the graphic had been settled upon I needed to measure my surface, in my case I decided to use my fuel tank. You can find some really great tutorials here on measuring your surface. Now that you have your measurements and the idea you can head over to Lettering on the Cheap and build your graphic in their design tool- or call them up and they’ll design what you’re looking for. It’s really that simple.
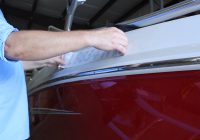
With my Graphic Design in hand I was ready to apply my decal. What’s wonderful about applying it myself is that it only takes about 30 minutes from start to finish and that includes dry time. Had I taken my bike to the shop I would have been looking at least a one day turnaround, if not more. I probably would have had to schedule an appointment and I certainly wouldn’t have been walking out of there without at least a $70 fee just for time and labor. Applying the vinyl is very easy and again Lettering on the Cheap provides some fantastic video tutorials here. Once the graphic was applied, I let the bike sit out in the sun for about 20 minutes and just like that it was finished. I removed the application tape and stood there smiling from ear to ear.
Anyone who has put a graphic on their bike, I encourage to share their story and graphic! Let us know in the comments what type of designs you love and we may feature an article around it. Have questions or comments? Leave them in the space below.